In an earlier blog I showed how to create a screencast using Screencast-o-matic (this can be done on Mac or Windows). Now what I am doing in today's blog is show you a tool that is for Mac users, specifically: how to use QuickTime to create a screencast.
Launch QuickTime Player
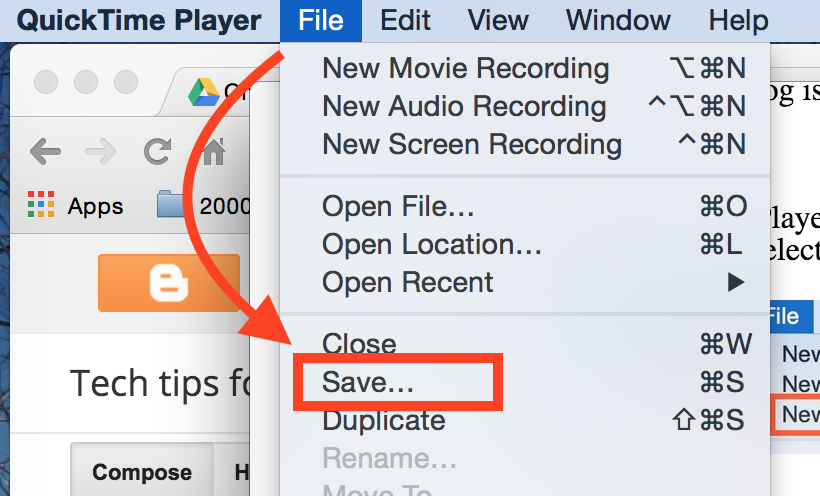
From the file menu select "New screen recording"
This then opens up a window that invites you to start recording. From the drop down menu I recommend that you select the option to "show mouse clicks while recording" (that way viewers can see you moving your mouse on your screen, which helps them focus on where you are pointing):
When you click on the red button to start recording, a box will pop up giving you two options: either you can just click anywhere and your entire screen will be recorded, or (which I recommend), drag your cursor around the portion of the screen that you want to record. Also, and very important, it tells you how to end the recording when you are done (and this part is not obvious!!)
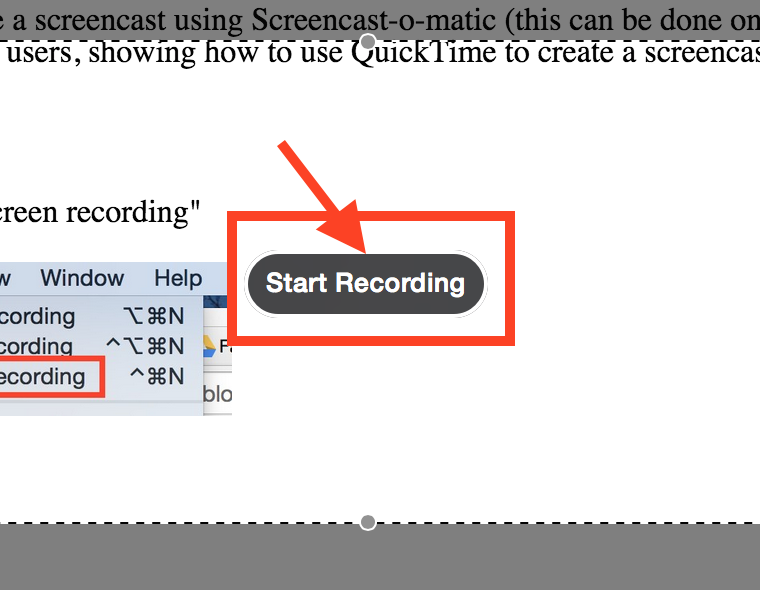
Once you have drawn around the area you want to record, a button appears in the middle of your selected area inviting you to start recording. Click on it.
Your screen and your voice is now being recorded, so you can create and narrate your screencast. When you are done, look at the very top of your screen on the bar. You will see a little black record button (note: your bar may not look the same as mine does -- see screenshot below -- but look for the little black done in a circle). Click on it and it will stop your recording.
Your screencast video will open in QuickTime on your desktop. From the QuickTime file menu options, select "Save" and save your screencast (to wherever you would like to save it).
You can now share this video. Some options are:
Insert into a PowerPoint or Google Slide
Upload to YouTube
Upload to your Google Drive and then share with whoever you would like (public, a class list, or individuals)
In the old days (before I drank the Google Drive Kool-Aid) when I had students work in groups in class, I'd give them a piece of newsprint and a marker, and have them create a summary of their discussion on the paper. One student wrote on the paper while the rest looked on and contributed. When they were done, I'd have them post their sheet on the classroom wall as their group spokesperson explained to the class what their group had done. It worked pretty well.
Then I discovered the power of using a shared Google Presentation (now called Google Slides), which is Google's online version of PowerPoint -- on steroids. Now what I do when I have students work in groups is, ahead of time, set up a Google slide document which I share with the whole class. I create one slide per group of students (so, for example, in a class of 30 students, I'll typically create 6 slides, with one slide designated for each group of students, 5 students per group). In class the students then discuss their group task, except instead of recording their ideas on the newsprint poster, they type on their group's shared Google slide. There are multiple advantages of this over the old newsprint:
What they type is easily legible (vs. handwritten poster) and students can also insert photos, videos or any other media or visuals.
Students can use the slide for the highlights of what they want to say, and the notes portion of the slide (beneath the slide) to include more detail (as well as references and links, if needed).
More than one student can type and edit, because each student usually has a computer or other Internet enabled device on which they can access the slide (so that the ideas of students who are quieter aren't left out, or misinterpreted by the person who is recording what s/he thought was said). e.g. if the person who is typing misinterprets what their group member said, the group member can edit what was typed to correct it. If a student's idea is not included on the slide, s/he can add it.
If students are not physically in the classroom (e.g. if a student is at home, sick), I give them the option to join class via a Google Hangout. When students work in groups, the student on Hangout joins with their group and participates along with everyone else. When the group uses a shared Google Slide, the student at home can follow along and add her/his ideas just as the ones who are face-to-face in class can do.
When groups present their findings, I project the slides on screen in class.
After class, all students still have access to the shared slides to use for review.
Below I have a video demonstrating how I create these shared Google slides:
This coming week in one of my classes I will be teaching about online collaboration tools. I thought I'd share a list of some of the ones we will be looking at, and then invite you to use one of these, called Tricider, to share your ideas and vote on the ideas of others.
Here is a list of an assortment of collaboration tools:
Voicethread : a media centric way to have conversations
Voxer: talk, text, send photos, send live or recorded messages to one person or entire group
So what is your favorite online collaboration tool to use as a teacher with your students (or for to have students to use with each other)? Go to my Tricider Tricision to share and vote!or (and!) respond with your ideas by commenting on this blog post. Thanks! :)
In an earlier blog I described different tools that I use for creating screencasts. In this blog I have created a video in which I show you how to use one of these, namely Screencast-o-matic. If you would like to download and install Screencast-o-matic on your own computer (Mac or Windows), go to http://www.screencast-o-matic.com/ and click on the download button.
Once you have downloaded Screencast-O-matic to your computer, then you are ready to start making a screencast! In the video below I demonstrate how to do this.